Almond Sugar Cookies

The holiday season is upon us—the ground is covered in snow, the tree is up, and the radio station in the car is set for classic holiday tunes. Last year around this time, my husband and I were anxiously awaiting the birth of our daughter who was born shortly before Christmas.

As soon as we returned home from the hospital, our family was there to exchange gifts and meet our newest addition. It is safe to say I had no holiday spirit while recovering from a c-section and adjusting to life with a newborn.

Perhaps to make up for last year, I am in particularly bright spirits this year. I am excited to create a new set of holiday traditions for my daughter to enjoy, even if she is too young to fully enjoy them right now.

Last weekend, we all bundled up and went out to pick our tree (which she slept through). She’s already found her gifts beneath the tree (and tried to eat the wrapping paper). We listen to our favorite Christmas songs delivered by the same animated piano-playing snowman I enjoyed when I was young (she tries to make it a duet by playing the piano too).

The tradition I am most looking forward to sharing with her is baking and decorating Christmas cookies. I grew up with the tradition and continued it on my own as I’ve grown older. While I was rolling and cutting out these Almond Sugar Cookies, she was beside me on the floor, playing with a mixing bowl and spatula.

I plan to decorate these cookies with her later in the season, coloring some yogurt so she can fingerpaint her own masterpieces.

The holiday season feels new with a little one crawling around, and I can’t wait to create memorable experiences for her childhood.

IMG_0989-2.jpg

These Almond Sugar Cookies are a more flavorful take on the traditional cut-out cookies. Almond paste and almond extract are added to the dough, which give the cookie a deep nutty flavor. The dough is easy to roll and cut out, and bakes up smooth and flat to decorate. If you are looking for a sugar cookie with more flavor, add this cookie to your holiday line-up!

Almond Sugar Cookies

Yields 2-3 dozen, depending on size of the cookie

3/4 cup (170 grams) butter
1 cup (200 grams) granulated sugar
4 ounces (113 grams) almond paste
2 large eggs
1 teaspoon vanilla extract
1/2 teaspoon almond extract
2 3/4 cups (330 grams) all-purpose flour
1 teaspoon baking powder
1/2 teaspoon salt

In a large mixing bowl, beat together the butter and sugar until light and fluffy, about 3-5 minutes. Beat in the almond paste. Add in the eggs one at a time, mixing well between each addition. Beat in the vanilla and almond extract. Mix in the flour, baking powder, and salt until well combined. Wrap the dough in plastic wrap and refrigerate for one hour to firm up the dough.

Preheat oven to 350 degrees F (180 degrees C). Line baking sheets with parchment paper or a non-stick baking mat for best cookie removal.

Roll out the dough on a lightly floured surface to 1/4-inch thickness and cut out the cookies using cookie cutters (follow these tips for the best cookies). The dough that is not being handled should be kept refrigerated. Bake cookies for 6-8 minutes, depending on the size of the cookie. Cool completely on a cooling rack before frosting.

Peach Almond Galette

IMG_9634-2.jpg

At the beginning of June, my husband and I sat down and made a '“summer bucket list.” We checked in with our modest list for the first time last night. With August right around the corner, we have crossed off only one of the items.

Time has been getting away from me lately, entire days seemingly disappearing into the void. The daily routine is both a blessing and a curse. It’s wonderful for keeping a 7 month old (and her exclusively pumping mama) on a happy schedule, but it leaves little room for spontaneity.

In many ways, it feels like I’m hitting autopilot and cruising through life without engaging meaningfully.

IMG_9513-2.jpg
IMG_9560-2.jpg

I’ve been thinking recently about how to feel more present in my own life. Breaking the cycle and changing habits may be difficult, but it is starting to feel increasingly more essential. While I cannot change the large building blocks of my day, I can change my behavior in the small moments.

In general, I want to move myself away from the culture of detached consumption and into a space of creation. I need to set down my phone, so I don’t have the option of mentally checking out whenever the day begins to feel tedious. The endless scrolling does not bring me happiness, but it is so difficult to avoid.

Instead, I want to go for more walks with Baby N, cook recipes with seasonal vegetables, and bake a great loaf of sourdough bread with my new starter. I want to read more books and watch less television, spend mornings in the garden, and find ways to get out of the house and go on adventures with N (even if it is just to run a few errands). I want to build time into the day for myself and myself alone.

Wish me luck—change may be hard, but it is easier knowing it will make me a happier, more engaged mother in the end.

IMG_9612-2.jpg

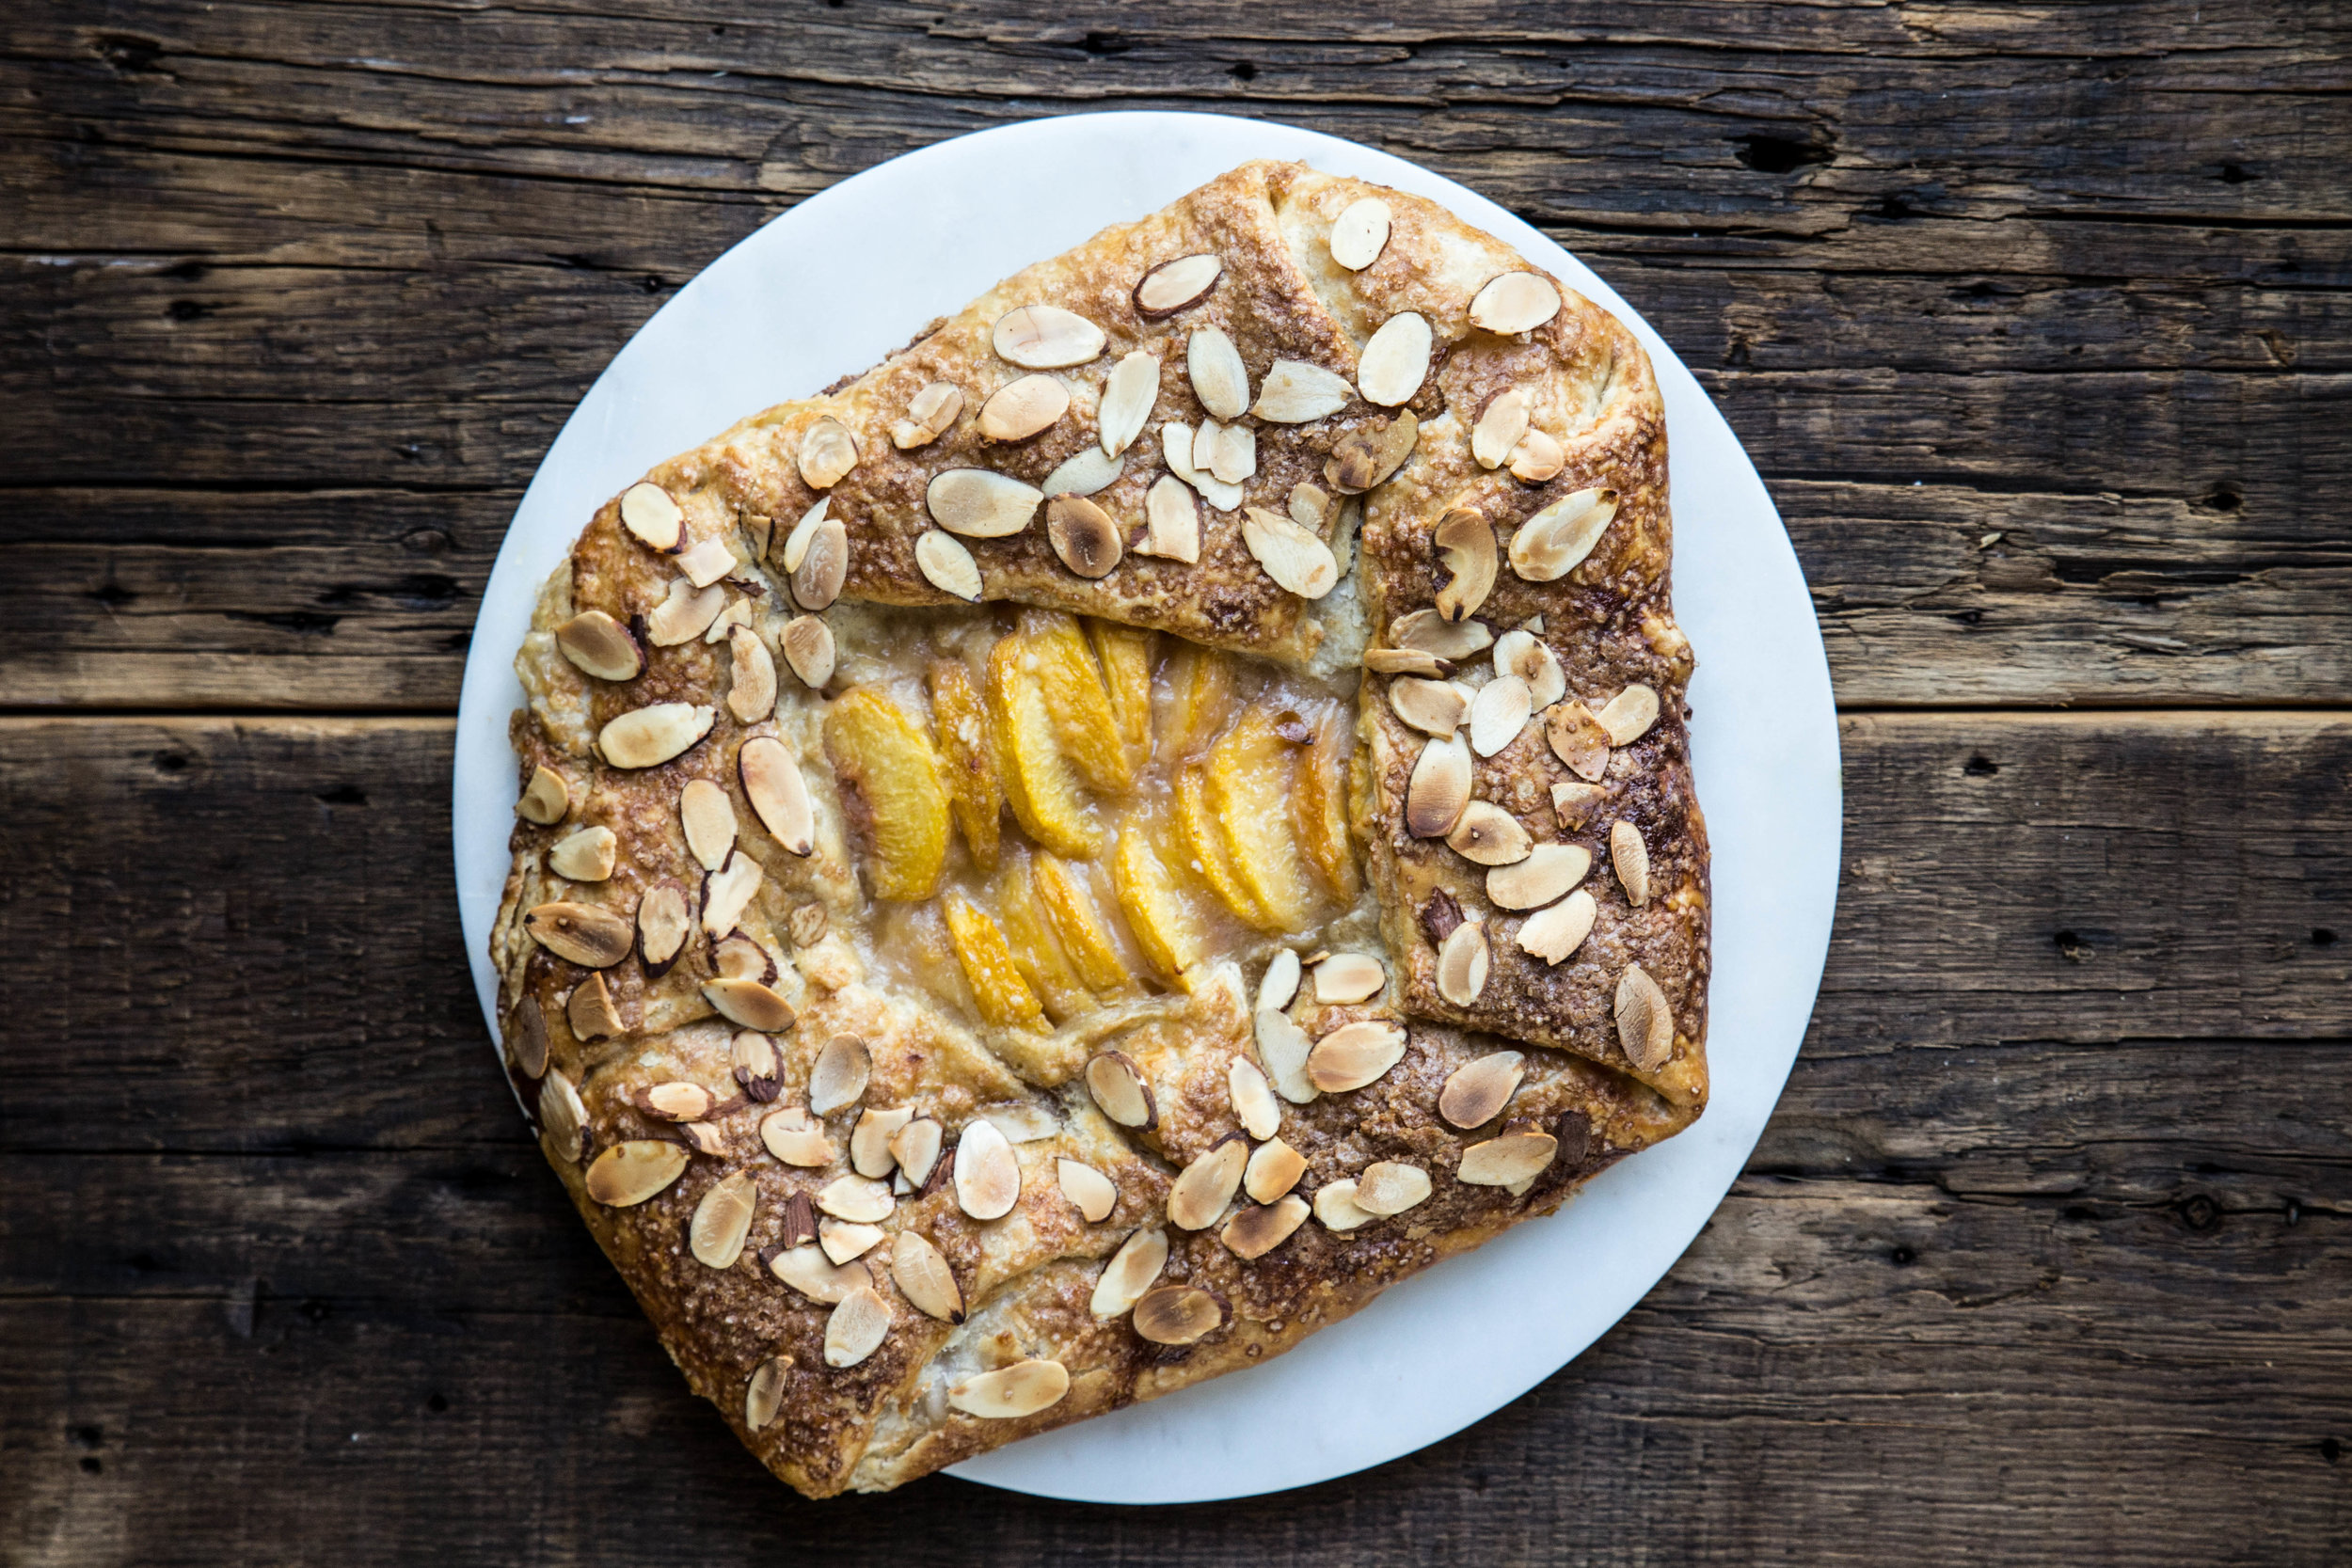
To me, it is simply not summer without a galette (as noted here, here, and here). These rustic cousins to pie are by far easier to pull together and feature the best of the ripe, seasonal fruit that summer has to offer.

I made this Peach Almond Galette three times in the last couple weeks for various events. I simply cannot get enough of this dessert. This galette stands out because of the addition of a thin layer of almond paste beneath the fresh peaches. The rich nutty flavor elevates the galette into a true pastry.

This is truly summer on a plate.

This Peach Almond Galette pairs fresh, ripe peaches with the rich, nutty flavor of almond. The galette comes together by layering almond paste between peaches and pie crust in a freeform dessert. With a sprinkling of sliced almonds and raw sugar before baking, the crust takes on the flavor of sweet, toasted almonds. While serving with a topping of whipped cream or side of vanilla ice cream would not be amiss, I prefer my slices unadorned and straight from the refrigerator. Enjoy whichever way your taste buds guide you.

Peach Almond Galette

Yields 6-8 servings, depending on size

6-7 medium sized peaches, peeled, pitted, and sliced
2 tablespoons all-purpose flour
3 tablespoons granulated sugar*
4 ounces (113 grams) almond paste
Recipe for single crust pie dough, chilled 
Egg wash (1 large egg + 1 tablespoon water, whisked)
1/4 cup (22 grams) sliced almonds
2 tablespoons demerara or raw sugar, for sprinkling

In a medium bowl, fold together the sliced peaches, flour, and granulated sugar. Set aside.

On a lightly floured surface, roll out the pie dough into a circle roughly 1/8-inch thick and approximately 14 inches in diameter. Next, roll or flatten out the almond paste into a layer approximately 1/8-inch thick. Place the thin layer of almond paste in the center of the pie dough, leaving a 3-inch border around the outside.

Layer the peaches over the almond paste in a decorative fashion. Fold up the pie dough over the filling, pleating the dough every few inches. Brush the visible pie dough with egg wash and sprinkle the sliced almonds and demerara sugar evenly over the dough. Refrigerate for 20-30 minutes to firm up the pie dough.

Preheat oven to 375 degrees F (190 degrees C).

Bake for 50-60 minutes, or until the crust is golden and the peaches have released their juices. Cool slightly before serving. Serve with a topping of whipped cream or side of vanilla ice cream.

*Add more or less to taste, depending on the sweetness of the peaches.

Rhubarb Almond Bars

IMG_0038-2.jpg

Last summer, I built a trio of large, self-watering cedar planters to start a deck garden. Our home is blessed with a large deck and, since the main living space overlooks the deck, I wanted to give it a little more life. Although we have plenty of yard space for a garden, we also have many critters (and deer) visiting frequently so it made more sense to elevate the garden to keep the plants safe from late night nibblers.

Each planter is 2 ft. by 6 ft., which leaves plenty of room for experimentation.

My interest in gardening is relatively new, but this hobby has quickly turned me into an enthusiastic plant lady. After killing every houseplant I attempted to grow up for many years, I was astonished when my black thumb seemingly turned green after moving into our house.

Apparently the trick for a green thumb is simply having large southeast facing windows—who knew?

Unfortunately, the first attempt at gardening in the outdoor planters was not very successful. In my eagerness to grow my own vegetables, I overplanted the space and didn’t do enough research on how to individually care for each plant. In addition, because the planters are self-watering (through a process of diffusion and soil osmosis), the plants with deep root systems ended up with root rot by midsummer.

By summer’s end, the only “successful” plants were the bell peppers (which grew only one picture perfect pepper each), the green beans, and the herb garden. Everything else—the tomatoes, cabbages, cucumbers, etc.—ended up producing very little or finally completing their slow death.

While the self-watering feature was definitely a curse, I only needed to water the plants once the entire season, so my laziness is more than willing to find a way to work within these constraints.

This year I am taking the failures of the previous summer and using them to (hopefully) do better this time around. To start, I did a little more planning and left more space for the plants to expand. Only plants with shallow root systems are allowed (peppers, onions, shallots, lettuce, carrots, herbs, green beans, flowers); the plants with larger root systems have been relegated to individual, well-draining containers (tomatoes).

I have my fingers crossed for now, but it will be another month or two before I’ll be able to label it a success or failure. Stay tuned.

I have plans to do a little landscaping and put in a rhubarb plant later this summer, but it will still be a couple years before we can harvest. Until then, the farmer’s market has everything I need.

I originally planned to make a strawberry rhubarb dessert, but I didn’t get around to baking until after the strawberries were past their prime. This recipe is all the better for it, because it allows the rhubarb flavor to truly shine. Paired with an almond oatmeal crust, these rhubarb-filled bars are a new way to enjoy this spring vegetable.

IMG_0043-2.jpg

This recipe for Rhubarb Almond Bars is an easy way to use and enjoy rhubarb. Almonds and oatmeal come together to form the base of the bars. Sliced raw rhubarb is added to the center (no cooking required!) before the bars are topped with the remaining crust and placed in the oven to bake. The nutty almond flavor compliments the tart rhubarb well. Cut into squares and serve warm, cold, or room temperature.

Rhubarb Almond Bars

Yields 16 servings (or 8 x 8-inch pan)

Almond Bars
6 tablespoons (100 grams) butter, room temperature
3/4 cup (150 grams) brown sugar, packed
1 large egg
1 teaspoon vanilla extract
1 teaspoon almond extract
1 1/2 cups (150 grams) old-fashioned oats
1 cup (120 grams) all-purpose flour
1/2 cup (45 grams) sliced almonds
1/2 teaspoon baking soda
1/2 teaspoon salt

Rhubarb Filling
3 cups (~14 ounces or 400 grams) fresh rhubarb, cut into 1/4-inch slices
1/4 cup (50 grams) granulated sugar
2 tablespoons cornstarch

Preheat oven to 350 degrees F (180 degrees C). Lightly grease an 8 x 8-inch pan.

For the almond base, beat together the butter and brown sugar in a large mixing bowl until uniform. Beat in the egg, vanilla, and almond extract, mixing until blended. Stir in the oats, flour, sliced almonds, baking soda, and salt. The batter will be slightly sticky. Using greased hands, press 2/3 of the batter into the bottom of the prepared pan. Set aside remaining batter.

For the rhubarb filling, stir together the sliced rhubarb, sugar, and cornstarch.

Spread the rhubarb filling over the top of the almond base. Crumble the remaining batter evenly on top. Bake for 40-45 minutes, or until lightly browned. Allow to cool slightly in pan before serving.