Pear Almond Tart

In the Upper Midwest, October is ordinarily a cold, rainy month with the occasional dusting of snow. It marks a change in seasons. We wrap ourselves in sweaters and scarves because the descending temperatures feel unfamiliar and we need more time to adjust. We turn on the heat, make our first pots of stew, and settle into a slower pace of living. This year, however, autumn has been mild. The sun is warm, the grass is green, and an inviting breeze sends promises of leisure and relaxation. Instead of spending my time in the kitchen, I am going to head outdoors and enjoy this fleeting spell of warmth.

Talk soon, dear friends.
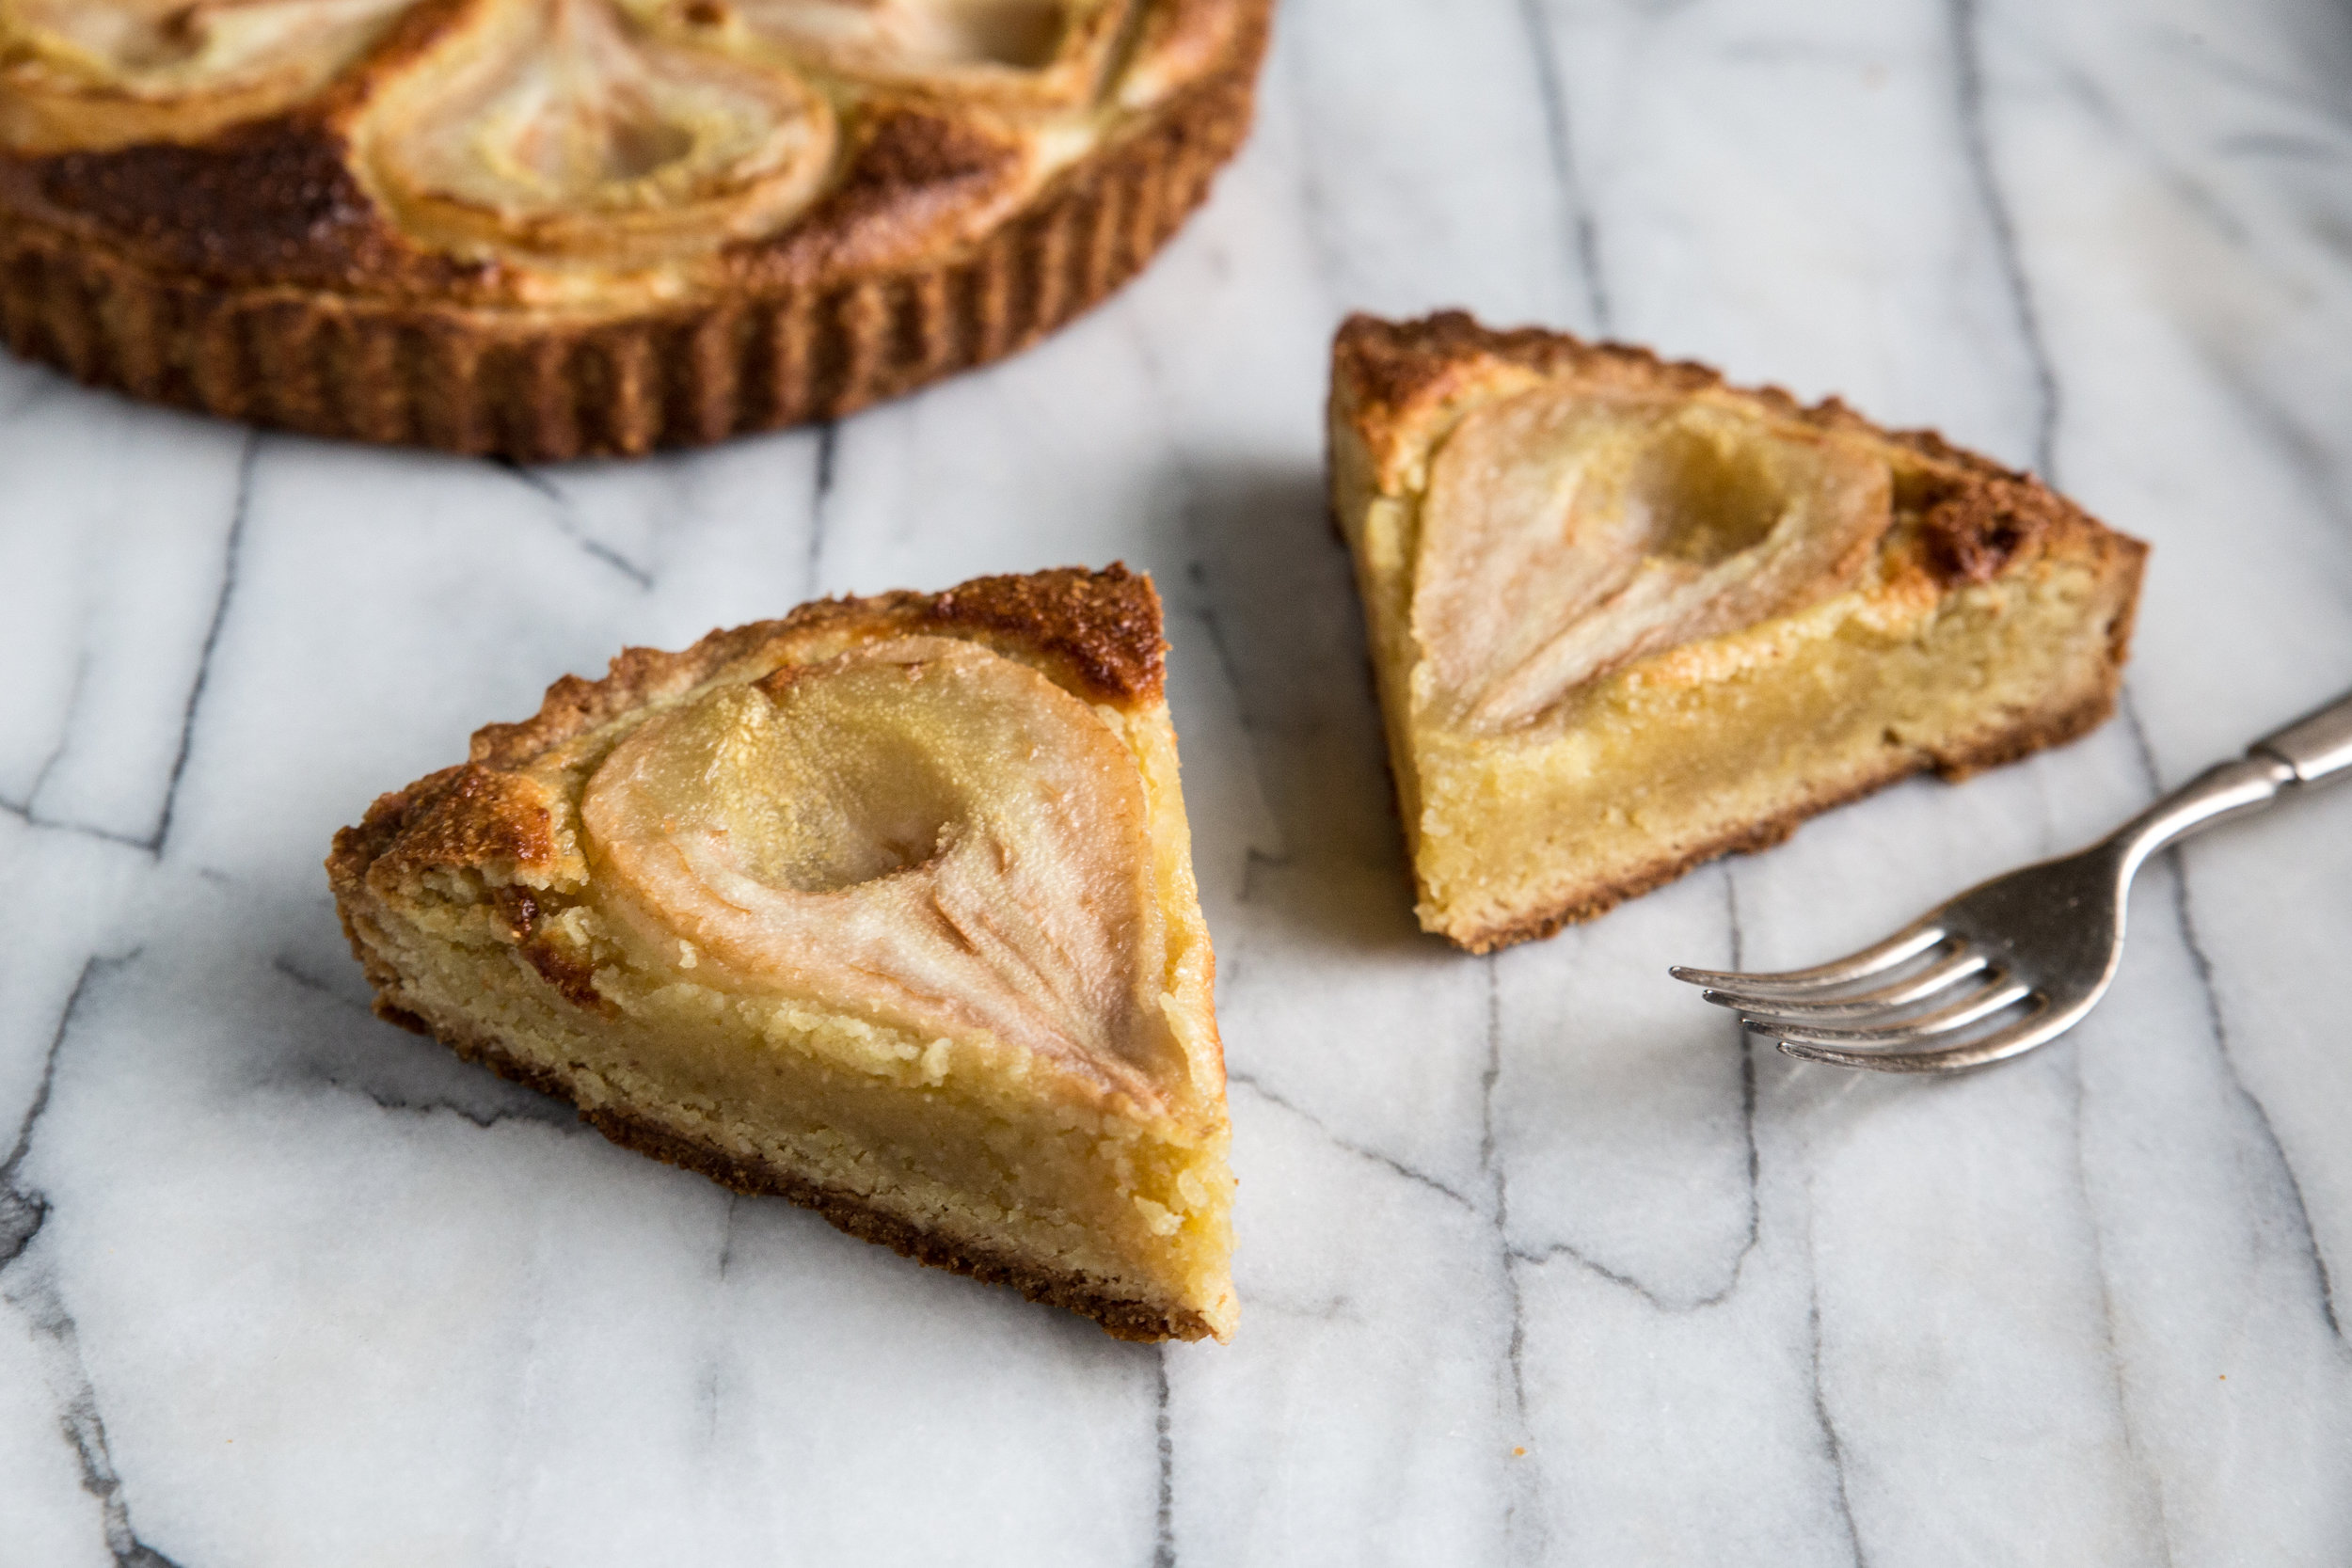
Autumn holds the best flavorsthe warmth of cinnamon, the spice of nutmeg, and the sweetness of winter squash. Even though this Pear Almond Tart does not incorporate any of these traditional flavors, it belongs in no other season. A version of this dessert has been on my mind since the beginning of summer, but I waited patiently until the timing was right. The pears are sweet, the crust is tender, and the almond filling has a rich, toasted quality.

Oh, and one piece is never enough.

The Pear Almond Tart allows this subtle fruit to take on a starring role. A tart crust is filled with a buttery almond filling and halved ripe pears. After baking, the almond takes on a toasted flavor and the pears soften, but keep their form. This dessert is a departure away from pumpkin and apples, but the trip is well worthwhile. 

One Year Ago: Boiled Cider and Pumpkin Molasses Bread
Two Years Ago: Vanilla Bean Malt Cake and Cinnamon Raisin Swirl Bread
Three Years Ago: Pumpkin Espresso Bread, Triple Coconut Cookies, Caramel Apple Granola, Chewy Vanilla Bean Bars, and Chai Spiced Rice Pudding
Four Years Ago: Pumpkin Granola, Chocolate Cherry Bread, Pumpkin Spice Latte, and Oatmeal Raisin Crisps
Five Years Ago: Banana Bread, Maple Roasted Bananas, Berry Crumble, and Chocolate Avocado Cupcakes

Pear Almond Tart

Yields 9-inch tart (6-12 servings)

Tart Dough
1 1/4 cups (150 grams) all purpose flour
1/3 cup (66 grams) granulated sugar
1/4 teaspoon salt
8 tablespoons (113 grams) butter, cold
1 large egg, lightly whisked
1 teaspoon vanilla

Filling
3 tablespoons (50 grams) butter, room temperature
1/2 cup (100 grams) granulated sugar
2 large eggs
1 teaspoon vanilla extract
1/2 teaspoon almond extract
1/4 teaspoon salt
1 2/3 cups (160 grams) almond flour
3 ripe bosc pears, peeled, halved, and cored

In a large mixing bowl, whisk together the flour, sugar, and salt. Cube the butter and add it to the dry ingredients by rubbing it between your fingers until the dough resembles coarse sand. Add the lightly whisked egg and vanilla extract, folding the mixture until the dough comes together with a uniform appearance.

Form dough into a disk, wrap in plastic wrap, and chill in the refrigerator for 30-60 minutes, or until cold.

Preheat oven to 350 degrees F (180 degrees C). Line a 9-inch tart pan with parchment.

On a lightly floured surface, roll out the dough into a 12-inch circle. Transfer into the tart pan, trim the edges, and poke the bottom of the pan with a fork several dozen times to prevent the dough from rising while baking. Bake for 20-25 minutes, or until lightly browned. Remove from the oven and allow to cool. Keep the oven temperature at 350 degrees F.

In a large mixing bowl, beat together the butter and sugar until light and fluffy. Beat in the eggs, vanilla extract, almond extract, and salt. Stir in the almond flour until uniform. Spread the filling evenly into the tart shell with an offset spatula.

Place the pear halves upright in the filling and press down gently. Bake for 50-60 minutes, or until the almond filling is baked through and appears lightly browned. Cool to room temperature before slicing and serving.

Carrot Almond Muffins

Two months after my move to the city, I have settled into the new routines of everyday life. The daily commute, the neighborhood, and the apartment kitchen have a familiarity about them that only time can bring, but the intimacies end there. It feels like I'm on an extended vacation (but I'm not sure where I am on a vacation from). After moving so often between cities and countries during my twenties, I'm finding it harder to grow an attachment to each new location, to put in the effort to make connections and dig down roots.

I call this place home, but I'm not sure I believe it yet.

IMG_9368.JPG

The most difficult adjustment has been the early morning rise. When the alarm buzzes at 5:40 am, I groggily pull myself out of bed and go through the motions, but my pace is slow and my mind is still back in bed, resting under the sheets. To ease into the day, I do as much as I can the evening before. Breakfast, especially in the form of a reheated muffin, feels like a lifesaver in those pre-dawn hours.

With a cup of coffee in hand, I make it out the door on time, ready to start another day. 

Carrot Almond Muffins are spiced with cinnamon and nutmeg to bring out flavors of autumn. The muffins rely on brown sugar and the natural sweetness of the carrot to bring a warmth to the flavor. Chopped almonds, mixed into the batter and sprinkled over the top, provide a hearty texture. Layered with butter or chocolate hazelnut spread, these muffins can improve any morning, no matter how early or late your morning begins.

One Year Ago: Chocolate Hazelnut Spread and Espresso Chocolate Coffee Cake
Two Years Ago: Honeyed Apricot Granola Bars and Chocolate Banana Chip Cookies
Three Years Ago: Caramelized Leek Biscuits, Zucchini Chocolate Chip Muffins, Cinnamon Rolls Cookies, Bourbon Peach Jam, Whole Wheat Chocolate Chip Scones, and Brown Butter Pear Muffins
Four Years Ago: Lemon Blueberry Scones, 3 Milk Coconut Cake, Garden Tomato Tart, and Whole Wheat Irish Soda Bread
Five Years Ago: Strawberry Shortcake, Chocolate Raspberry Oatmeal MuffinsBrown Sugar Coconut Bubble Tea, and Whole Wheat Banana Pancakes

Carrot Almond Muffins

Yields 1 dozen muffins

3/4 cup (150 grams) brown sugar, packed
1/2 cup (120 mL) vegetable oil
1 large egg
1 teaspoon vanilla extract
2 teaspoons ground cinnamon
1/8 teaspoon ground nutmeg
1 teaspoon baking powder
1 teaspoon baking soda
1/2 teaspoon salt
1 cup (120 grams) all-purpose flour
1 cup (113 grams) whole wheat flour
1/2 cup (120 mL) milk
1 1/2 cups (150 grams) peeled, shredded carrots
3/4 cup (110 grams) almonds, coarsely chopped & divided

Preheat oven to 350 degrees F (180 degrees C). Line a muffin tin with baking cups.

In a large mixing bowl, beat together the brown sugar, vegetable oil, egg, and vanilla until uniform. Stir in the spices, baking powder, baking soda, salt, flours, and milk until smooth. Stir in the carrots and 2/3 of the chopped almonds.

Divide batter evenly between the baking cups and sprinkle tops with the remaining 1/3 of the chopped almonds. Bake for 18-22 minutes, or until a toothpick inserted into the center comes out clean.

Blueberry Honey Scones

This past July, I boarded a plane and headed to Norwich, Vermont for a week long "bake-cation." The destination was the Baking Center located at King Arthur Flour's flagship campus. Along with a baker's store and bakery, the campus features a baking school, which teaches a range of bread and pastry courses at levels from beginner to professional. Since it has long been my dream to go to culinary school, I couldn't imagine a more indulgent way to spend a vacation. I signed up for two courses: Beauty and the Baguette and Pastry Principles & Practice.

The baguette course was the first on the list and took place during a single afternoon. Entering the classroom, I wasn't sure what to expect, but the whole experience left me pleasantly surprised. The class sizes were kept small and each student was supplied a fully equipped station. The instructor broke the lesson down into sections, demonstrating a few steps before giving us a chance to try it out on our own. What impressed me the most, however, were the dozens of baguettes prepared at various stages so that we would all be able to practice the shaping and slicing techniques until we had it mastered.

Though the class consisted of people who had never kneaded dough to people who bake bread several times a week, we all came away with perfect baguettes and the knowledge on how to make them at home. I learned more about crusty bread in those four short hours than I have in years of trial and error on my own. I mean, look at these beauties (made in my own oven, no less)!

The second course, Pastry Principles & Practice, was an in depth course, lasting four days and spanning everything from pie and puff pastry to tarts and eclairs. Even though I had my fair share of pastry knowledge going in, the course was taught in such a way that home bakers and professionals would all have new information to gain. I was familiar with most of the techniques, but the reasons why each step was necessary was fascinating for me. Even with something as basic as cake, I was shocked by how much I didn't know or hadn't considered. I came away with pages of notes, scribbled in the margins of the recipes, on techniques, flavor combinations, and the science of baking. 

Time passed quickly during the five-hour pastry classes. We moved between activities smoothly, never left waiting around for something to come out of the oven or the next dessert to be prepped. The instructors were professional and knew the answers to all of my curious questions. Besides baking (and eating), my favorite part of the Baking Center was never having to do dishes. As soon as something was dirty, an instructor whisked it away and moments later came back with it sparkling clean. If only I could get this kind of service at home...

Overall, I adored my time at King Arthur Flour's facilities and highly recommend their courses. Even as an experienced baker, I came away with a wealth of new knowledge and techniques to play around with at home. If you live in the Northeast, do consider taking a class at the Baking Center. They have many courses for holiday baking and bread making coming soon. 

Pastry Affair Resized for Blog-25.jpg

In partnership with King Arthur Flour, I will be bringing you a new recipe each month, for the next six months, filled with step-by-step instructions and photographs to help you grow as a baker. I am so excited to share the new techniques I learned with you! We will start with easier recipes, like scones and cakes, and tackle more difficult recipes as the months pass (like eclairs and crusty breads!).

By the end of our journey, you'll have a solid understanding of basic yeast breads and pastries. I hope you bake along with me! You can show off your baking creations by tagging them with #kingarthurflour. Roll up your sleeves and pull out the flour, because it's about to get delicious in here. 

Scones are versatile pastries that are easy to assemble with interchangeable ingredients to match the flavors of the season. Similar to pie crust and biscuits, the real secret to great scones is cold ingredients and limited handling. To start, whisk together the dry ingredients. Take butter—which must be cold—and cube it with a knife. Add the butter to the dry ingredients by rubbing it between your fingers until the dough resembles coarse sand. If you have a few larger pieces of butter (as shown above), that is actually a good thing! Alternatively, you can bring out a pastry blender for this step, but I don't recommend using a food processor or mixer because you lose control over the size of the butter pieces.

The cold butter layered in the flour is the trick to creating a flaky scone. When the butter melts in the oven, it will leave pockets between the flour, creating layers. If your butter softens or melts before baking, these layers will not form. If your kitchen is too warm, place the mixture in the refrigerator to cool down the butter before moving on.

For the next step, whisk together all the wet ingredients and, along with the blueberries, add it to the flour mixture. Using a bowl scraper, delicately fold the dough on itself just until it is evenly moistened. Turn out the dough onto a lightly floured surface. If you need to knead the dough to bring in any dry pieces, it is okay to do so, but knead only a few times to limit your handling.

Ideally, we want to avoid over mixing or overworking the dough. Mixing or kneading the dough encourages gluten to form. While gluten formation is wonderful for bread dough, it is the opposite of what we look for when creating light, flaky pastries. 

Using floured hands, bring the dough into a ball and flatten it into a disk with your palms until it is roughly 1-inch thick. Using a bench knife (or sharp kitchen knife), cut the dough into 6-8 pie shaped pieces. Be careful to only use a straight up and down motion when cutting the dough. Using a dull knife or moving the knife side-to-side will seal the edges of dough, which will prevent the scones from rising to full height in the oven. Brush the scones with heavy cream to encourage browning and set them into the oven to bake.

blueberryhoneyscones4.jpg

Blueberry Honey Scones are flaky, decadent morning pastries that are best served alongside a mug of coffee or tea. Fresh blueberries and honey are the star flavors in this scone, adding chords of sweet and tart to the overall character. Before serving, drizzle the scones with additional honey and serve with a side of creme fraiche. 

One Year Ago: Citrus Zucchini Muffins
Two Years Ago: Nordic Pancake Cake and Vanilla Ice Cream Cake
Three Years Ago: Cucumber Zucchini Slices, Banana Rum Bread, and Vanilla Cardamom Peach Pie
Four Years Ago: Chocolate Beet Cake, Sweet & Spicy Chili Chicken Wings, and Zucchini Bread
Five Years Ago: Espresso Chocolate Shortbread, Whole Wheat Blueberry Muffins, and Chocolate Pear Cake

Blueberry Honey Scones

Yields 6-8 servings

2 cups (240 grams) King Arthur All-Purpose Flour
1 tablespoon baking powder
1/2 teaspoon salt
8 tablespoons (113 grams) cold unsalted butter, cubed
1 large egg
1 teaspoon vanilla

2 tablespoons honey
1/2 cup (120 mL) heavy cream, plus extra for brushing
6 ounces (170 grams) fresh blueberries*

Preheat oven to 350 degrees F (180 degrees C).

In a large mixing bowl, whisk together the flour, baking powder, and salt. Add the cubed butter and rub the butter between your fingers until the dough resembles coarse sand with a few larger pieces remaining. Set aside.

In a small bowl, whisk together the egg, vanilla, honey, and heavy cream. Pour over the scone batter, add the blueberries, and lightly mix until the dough comes together. The dough will be somewhat sticky.

Place the dough on a lightly floured surface. With floured hands, form the dough into a circle. If you need to fold the dough over to evenly distribute the moisture, you may do so, but no more than a few times. Flatten the dough until it is about 1-inch thick. Using a sharp knife, cut 6-8 equal pie wedges. Transfer scones to a baking sheet using a flat spatula and brush the tops of the scones with heavy cream. Bake for 25-30 minutes, or until lightly browned.

Drizzle the scones with honey and serve with a side of creme fraiche. Tag your creations with #kingarthurflour to show off your baking!

*Frozen blueberries (not thawed) will also work, but the berries will dye the scone a bright blue. 

This post is sponsored through a partnership with King Arthur Flour. Travel, accommodations, and courses at the Baking Center were provided. All thoughts and opinions are my own. Photographs from the Baking Center are copyright © King Arthur Flour